Collecting seed from anything you grow in the garden is a simple task, but not everyone is enthusiastic enough to get into the habit. Amongst what I've saved this season are some Russell Lupin seeds (below) which are easy to collect now that the flowers are finished. All of these seeds are from the plants we grew to attract bees to our garden, so really no effort involved and a great result without even trying.
Tuesday, February 15, 2011
Sunday, February 13, 2011
Almost Done
With the tomato season coming to a close for us here, I spent the afternoon pulling out tomato plants, but still have a few plants left that I want to get at least one fruit from.
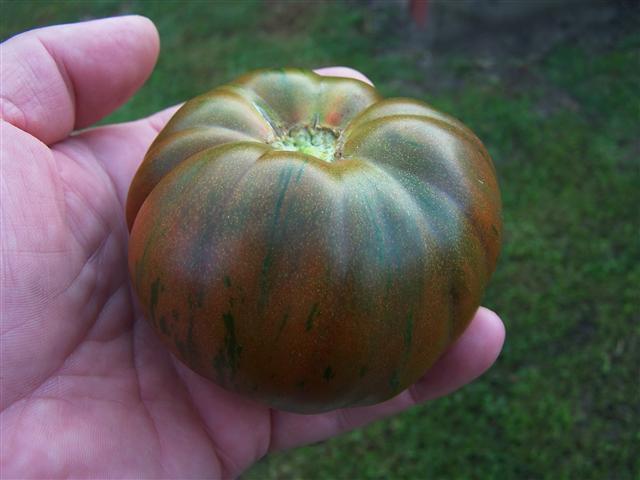
Here's some from today, including an almost Black/Red with a beautiful sweet flavour and no sign of acidity along with a nice clear yellow.
These are Negrillo de Almoguera and Merciano Amarillo, both from Spain together with Caro Rich and Chocolate Stripes.
Thursday, February 10, 2011
Our Top Tasting Tomatoes 2010/11
We've started to pull out our tomato plants as quite frankly, we're getting sick of eating so many. The season here has been the best we've had in years and all plants have produced abundant amounts of fresh tomatoes of every shape and colour.
Our very best tasting tomatoes this season has to go equally to Morado and Malakhitovaya Shkatulka, which are both fabulous and get a 10/10 from us.
Here's Malakhitovaya Shkatulka we cut earlier - notice how big it is on the scales.
Friday, February 4, 2011
Off To School
Monday the 7th February 2011 sees me start a year of study at the local Chisholm Institute, where I will be doing my Certificate 3 in Production Horticulture Course. Depending on the workload as to how much gardening I'll get time to do, but I feel competent enough to say that I should cope with the course subjects, plus I may even get some time for propagating some Tuberous Begonia's.
Wednesday, February 2, 2011
It's Tomato Season here.
As you will soon see, it's tomato growing season here at The Junction and we're having a great season too. We've had a mild and moist Summer here this season and together with some humid weather, it has been great for tomato production. I've posted a great selection of the ones we liked and have rated them out of ten, to our taste.
First on the list are Japanische Zwiebel which translates to Japanese Onion which I've been waiting on and just picked these earlier in the week and as far as taste goes they're nice, but we'd rate them 6.5/10. They have a firm flesh which soften when ripe.
Next on the list is a pink Cherry that grew as something else, so rather than just call it an unknown because I can't find the true name, I'm going to name this one Ozgrow Cherry after my garden forum. A lovely tasting cherry.
Then comes another unknown from a stray seed, this time it's a Grape tomato so as it doesn't have a name either, I'm going to call it McSee's Grape. I like this one very much and think I'll be growing it again. Taste is great.
As there are so many photos to post, I'll just add their names under the photos and if there's any further comment to make about any of them.
And these aren't all of the varieties grown here this season.
Saturday, January 29, 2011
First Chilli for 2011
Jan picked the first of the Chillies today, with Garden Salsa being the first to turn red. A nibble on the end gave the comment that it tasted like an apple.
Saturday, December 25, 2010
I See Blue
Tall Tomato Plants This Season
With the milder wetter Spring and Summer to date, my tomato plants have grown so big, they are 10cm (4") from the roof of my bird net enclosure which is 2.4m (8ft) high. On a couple of the plants, I have fitted blossom bags that are 2.1m (7ft) off the ground.
One of the main culprits is Rosado de Ademuz.
Tuesday, December 21, 2010
"Hotlips" or Rocoto Tree Chilli
I met a fellow stall holder at a Market last week and he was telling me about his "Hotlips" or Rocoto Tree Chilli that he has growing and loaded with fruit all year, so I needed some tubes from him, so visited him this morning. This is an amazing plant, it grows through a Melbourne Winter and is currently loaded in flowers and fruit in all sizes to almost fully ripe. The plant in the photos is approx 1.5 x 1.5m and doing well in wet clay soil, but can grow up to 3.0m high.
I came home with two tiny seedlings that I'll grow in pots for a while to get some size. I can see these will be a good seller in the future. Without even tasting them I could tell they were very hot, as when I was rinsing the seeds, I could feel my throat burning from the fumes coming from the seeds.
Monday, December 20, 2010
Bagging Tomato Blossoms
Anyone that knows me, will also know that I am committed to saving the purest tomato seeds that I possibly can, as I hate growing a plant for 6 months only to find it is from 'crossed' seed.
I'm re-posting this useful topic from my Garden Forum, (www.ozgrow.com) so that it is available to all who read my Blog who grow Tomatoes or Chillies, as it is suitable for both.
As an aid to the new growers who want to collect their own tomato seed, I'll try and give a brief run down on how I bag my tomato blossom to get the 'pure' fruit for seed saving, as doing it and writing about doing is not easy to explain in full. Assuming you have already got the organza bags, ribbon and tomato plants that are starting to flower, you're ready to start.
Working close to your plant, it is best to select the flower truss you want to fit the bag to.

Taking your marking ribbon, tie a running loop so it can be fitted to the stem of the truss. If you take each end of the ribbon, cross over and pass through 'twice', like the first part of doing a bow (as photo). Then slip over the truss and pull the ends until a loose fit on the stem. The idea with the running loop is, that when pulled to a loose fit around the stem, as the truss enlarges, the loop will slip open without strangling the truss and not come undone in the long process.

Take your organza bag and fold the top part back, so that everything above the pull string is back over the bag, this will give you a better fit on the stem when the bag is fitted.


Now the tricky part of the bagging process, to fit the bag over the unopened flowers, so that the bag fits onto the stem and the flowers are actually inside that part of the bag when the strings get pulled. Once the bag is pulled tight, grab each side of the bag and pull apart to give a more open area within the bag.

Now it's just a waiting game for the flower to set fruit, which will be noticeable when small tomatoes start forming inside the bag. When all the flowers have fruit, remove the bag. Here's a bag with fruit showing on some of the flower stems. Hopefully from your bag you'll get quite a few fruit to use for your seed. Just remember when the time comes that the fruit with the ribbon are the ones you are saving for seed.

After the bag comes off your truss should look similar to this.

Washing Instructions.
I'm re-posting this useful topic from my Garden Forum, (www.ozgrow.com) so that it is available to all who read my Blog who grow Tomatoes or Chillies, as it is suitable for both.
As an aid to the new growers who want to collect their own tomato seed, I'll try and give a brief run down on how I bag my tomato blossom to get the 'pure' fruit for seed saving, as doing it and writing about doing is not easy to explain in full. Assuming you have already got the organza bags, ribbon and tomato plants that are starting to flower, you're ready to start.
Working close to your plant, it is best to select the flower truss you want to fit the bag to.

Taking your marking ribbon, tie a running loop so it can be fitted to the stem of the truss. If you take each end of the ribbon, cross over and pass through 'twice', like the first part of doing a bow (as photo). Then slip over the truss and pull the ends until a loose fit on the stem. The idea with the running loop is, that when pulled to a loose fit around the stem, as the truss enlarges, the loop will slip open without strangling the truss and not come undone in the long process.

Take your organza bag and fold the top part back, so that everything above the pull string is back over the bag, this will give you a better fit on the stem when the bag is fitted.


Now the tricky part of the bagging process, to fit the bag over the unopened flowers, so that the bag fits onto the stem and the flowers are actually inside that part of the bag when the strings get pulled. Once the bag is pulled tight, grab each side of the bag and pull apart to give a more open area within the bag.
Now it's just a waiting game for the flower to set fruit, which will be noticeable when small tomatoes start forming inside the bag. When all the flowers have fruit, remove the bag. Here's a bag with fruit showing on some of the flower stems. Hopefully from your bag you'll get quite a few fruit to use for your seed. Just remember when the time comes that the fruit with the ribbon are the ones you are saving for seed.
After the bag comes off your truss should look similar to this.

Washing Instructions.
Remember if reusing the bags, that they actually hold quite a lot of pollen in the fibres and need to be washed to remove it. A tip for washing your bags is to use some Nappy San in a half bucket of warm/hot water, then add a squirt of Domestos to the water and it will assist with the Pollen release from the Organza. Don't soak the bags with any bleach as it will make them deteriorate. Rinse well then hang to dry.
Monday, December 13, 2010
Striving for Purer Seed
In an effort to collect a purer strain of seed from my Chillies this season, I've decided to glue rather than bag flowers, to stop them getting cross pollinated. The idea is that using a PVA Glue will actually hold the flower petals together allowing self pollination to occur, before the new emerging fruit splits the flower as it grows, making the seeds as pure as they'd be if a bag was tied over it.
For the sake of this experiment, I'm using a PVA Craft Glue.
Sunday, December 12, 2010
Subscribe to:
Posts (Atom)