Saturday, September 29, 2018

Is This The Final List?

I thought I would remember all the varieties I'm growing this season, but without doing a stocktake now , I think I may have most of the varieties here. Now Kotlas is out of the running as it died, so I'll go with these until I find others I've missed. Some like Grubs Mystery Green & Black Krim I may pass until next year as there are lots of seed around for these.

Could this be my final list.

Arkashin
Banana Currant
Black Krim
Bychok
Ceylon
Chocolate Stripes
Collioure Long Plum
Cows Tit
Crisana
Donskoi
Duncan's Dutch
Giant Belgium
Greek Witness
Grub's Mystery Green
Korall
Kotlas
Le Case di Apulia
Lime Green Salad
McSee's Grape
Monomakh's Hat
Morado
Morning Rose
MS
Nicoleta
Orlinyi Klyuv
Poil Blanc
Prairie Fire
Purple Russian
'Rare'
Rosado de Ademuz

Russo Sicilian
Sakharnyi Zheltyi
Siletz
Speckled Roman
Tappy's Heritage
Toedebusch Pink
Totem
Truffaut Precoce
UK2000
Village Red
Vodar
White Oz Cherry
         

Friday, September 28, 2018

The End is Nigh

Well, I'm probably down to 6 or 8 varieties to prick out then that part is complete and I can sit back and watch them grow. Some varieties are slow to get up to be showing the first true leaf stage, which is when I prick them out into the foam cups. Yesterday, I watered the cups with a solution of the red bottle Tomato & Vegetable PowerFeed Liquid feed. It's quite strong, as 20ml in a 9 litre watering can and it was still quite black in colour. I also used the powdered form of Tomato Food in the potting mix at pot up time, so any food store left in the cotyledons won't be needed now.

Some photos as usual, more for my reference than anything.


'Some' of my lot for this year.

Here are a some of the 30+ varieties I'll be growing this season, all being well as some I only have one seedling of and I'm hopeful of getting some fresh seed from them all.

 Toedebusch Pink
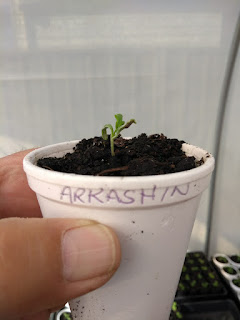
 Arkashin
 Rosado de Huelva
 Sakharnyi Zhelty
 Donskoi
 Negrillo de Almoguera
 Monomakh's Hat
Bychok

Two Heads - Better?

I posted a photo of a seedling a while back which I thought may have grown two heads, or two growing tips, well I was correct in my thinking.

Here's a photo of Totem, with it's double array of leaves.


Thursday, September 27, 2018

Garden Group - Seed Offer

I got the offer of some tomato seeds last night on a Facebook Garden Group by a guy in Stratford. I made contact with the guy today and called by and collected them on the way home from Bairnsdale. Apparently for a HUGE red tomato he's been growing, but not the best year for me, as I've got enough to grow this season and these will sit in the seed tin until next year.

Some of mine from today.
MS

Wednesday, September 26, 2018

Todays Newbies


In the first couple of trays in the old propagation mix, I grew what I believe were seeds of a rare tomato and got one spindly seedling that looks like it will fall over at any time. Having only four seeds left and no likelihood of getting any more, I sowed them all. After what seems an eternity, I have two showing in the mix this morning. Now this makes me happy as I'll grow both if they survive the journey.
Also, I found 6 seeds for a tomato I shared too much, that being Morado, that I gave all my seed away, except for the six. Well I planted the six and got five to germinate and while this was happening, I contacted someone who I gave seeds to to ask for some - just in case. They arrived and I sowed some of them as well, so another variety I'll save lots of seed from.
In the seed tin I found seed for the variety Cebrino, as at the time I couldn't remember what it was like, until I looked up photos I'd saved. This was a brown and green striped small plum, similar to the commercial Zebrino. I had a good germination with these, but pulled them out - that's how bad they were.

Here's a few photos of this morning, the rare tomatoes in the top photo, my Morado in the bottom. The Collioure Long Plum in the middle, this is from old seed saved on paper towel, posted earlier.


Monday, September 24, 2018

Two Leaf Types - Tomatoes

Tomatoes are generally referred to as having either Regular Leaf (RL) or Potato Leaf (PL) and as such each will take on a different appearance when growing. Although not grown commercially, potato leaf plants often produce great tasting fruit and home growers will often grow them, because of it.

Here are two photos showing the difference between the two types. Top plant is a Potato Leaf, while the lower is the Regular Leaf.


Tomato Genetics - Blind or Mule

Tomato Genetics at work.
It doesn't take long to pick them out, can you see them. 'Blind' or 'Mule' plants appear in some varieties of tomatoes. The two photos attached show what's commonly referred to as a tomato plant having a blind leader at their early stage in life. If planted and let grow, they won't form a growing tip, because it just never formed.


Mule isn't a common term that gets used much, but it does exist. It's often used because it will never reproduce 'offspring'. Sometimes, a plant will be classed as blind/mule when in fact it does grow a normal growing tip, but then it 'grows out' while the plant is still young. When I did my training in Horticulture, the teachers had never heard of this and thought I was pulling their leg, but after working with tomatoes for a time, it will in fact show up.


Sunday, September 23, 2018

The List of Varieties I Have - So Far

There are lots of single plants among this list, but I suppose I'm lucky I got them due to poor germination of my old seeds.

So far, these are the varieties I have in single pots, so I'll go into the season with most of these, plus the other varieties still on the second heat mat.

Arkashin
Bychok
Ceylon
Cows Tit
Donskoi
Greek Witness
Le Case di Apulia
Lime Green Salad
McSee's Grape
Monomakh's Hat
Morning Rose
MS
Negrillo de Almoguera
Nicoleta
Prairie Fire
Purple Russian
Rosado de Ademuz
Rosado de Huelva
Sakharnyi Zheltyi
Siletz
Speckled Roman
Toedbusch Pink
Totem
UK2000
Vodar
White Oz Cherry


Saturday, September 22, 2018

Totem Seedling

I'll leave this photo here to see if anyone comments on it, but I don't think anyone will see what I 'think' I see in it. lol

Friday, September 21, 2018

A View at What's Potted Up


I think that most varieties of tomatoes that had viable seeds have now germinated, with just a few empty spots where nothing grew. By next weekend, I should have all that I'm potting up done and then it's just a matter of growing them to size by the end of October. I usually work on about the 9th of October as my plant out day, but with starting later, this will also be later.

Here's what's potted up so far.


Thursday, September 20, 2018

New Life

I didn't give much hope to getting these seeds to germinate, as they'd been scraped onto a piece of paper towel, but I got a pleasant surprise when I saw they were breaking through this morning. By this afternoon, they were starting to stand erect in the tray. These are the Dutch variety my friend Duncan gave me seeds of on Saturday, so Saturday to Thursday is pretty good germination time. I'll give these a working name of 'Duncan's Dutch' until I can find something better, or their variety name.


Today's Progress

Today, my first job was to water all the seedlings, as they are sucking up the water well on these warm days here. The varieties left on the second heat mat are starting to poke their heads up, a couple I really need to save are Nicoleta and Crisana, both doing well and both given to me years ago from a Romanian family who bought them out here when they migrated to Australia. The Dutch variety I got and planted Saturday are showing through the mix, so all good.

The seedlings I gave a working name of Red Velvet, are up and I will grow a plant of this variety on with my 'new' growout, this being the second filial generation (F2). If all goes to plan, I should get plants with Potato Leaves in this generation and red heart shaped fruits after regular leaves and oblate fruit last time,  but they are at the stage where until they reach F6, they will be very unstable in what they do and how they grow.
By Friday, the seedlings will have had a dose of Seasol, which they'll take us as a tonic rather than as a fertiliser, then I'll decide if I need to feed them with some 'tomato food'.

 Heat mat #2 - doing well
Seedlings potted up so far.

Wednesday, September 19, 2018

Some of The Later Seedlings

A look at the newer seedlings this morning to see how they're going and I took some random photos for the blog while there. I have a single seedling emerged overnight for my F1 Red Velvet, which I'm regrowing from 2009 seed. I decided to try again with this tomato, it's shape and size at F1 was great, but it went down hill after that.

Here are some photos of the newer seedlings.

 Red Velvet F1
 Donskoi
 Orlinyi Klyuv
 Poil Blanc
 Giant Belgium
Greek Witness

Tuesday, September 18, 2018

On The Home Run With Seedlings

The saga of the poor germination continues, with the last couple of seedlings to emerge from the first heat mat being Monomakh's Hat and Arkashin.

The second heat mat started off fine with my White Cherry jumping out of the soil in numbers, but then the progression of single seedlings continued with :-


Greek Witness
Belgium Giant
UK2000
Donskoi
Poil Blanc
Black Krim
Purple Russian
Morado
Orlinyi Klyuv
Truffaut Precoce

Now I don't particularly mind getting one or two seedlings in a variety, but some have had stuck seed coats and I've lost the only seedling, where Arkashin for instance, I managed to get it off.

Most varieties from the first heat mat have had some seedlings potted up, the rest will become compost when I know they have survived the transplant.

Orlinyi Klyuv, known as Eagles Beak, is a red heart tomato and one I'm looking forward to growing, along with Donskoi a monster fruited plant if it grows true to form, so it and Belgium Giant should make a great pair.

As of today


Monday, September 17, 2018

The First Hundred

I didn't realise I'd potted so many up, but a check on them sees over 100 plants potted up into single cups, so far. Years ago I would do about 450 plants, but now I've slowed down and from now, only my specialty plants I'm growing especially for seed will be potted up. Although growing later, I think with our Summers getting longer, the varieties I'll be growing will do just fine here.


Sunday, September 16, 2018

Watering Your Tomato Plants Where They Need It.

When you look at a tomato plant growing in your garden, you may find roots close to the surface of the soil, but don't think for a minute they're going to be used solely for giving the plant a drink, as these are the feeder roots. These roots absorbs nutrients at soil level and actually feed the tomato plant from the soil, the actual roots that deliver moisture to the plant are much deeper. To be able to water your plant efficiently, the water needs to get to these roots and this is the best, quickest way to do it. Using 50mm slotted flexible aggie pipe, cut into 500mm lengths and before you plant your tomato, bury the tube into the hole so it protrudes about 50mm above the mulch if you use it.

Take a look what I've done here, then when you do it and it works for you, then you'll know the water is going where it's needed.


 Close up of the slots
 50mm Slotted Aggie Pipe
Cut to lengths - depending on plant types
The finished tube placed below tomato plant.

Feeding Your Garden Bed

My grandfather lived up the road from me as I grew up and he grew Grosse Lisse tomatoes every year and had a reputation for his gardening skills in the town. Two things he always told me about growing tomato plants were 'Feed the soil to support a crop' & 'Don't water tomato plants so the foliage gets wet', two things that I remember well.

My grandfather has been gone for many years, but I guess I listened to him as I still do these things now, the only thing is my grandkids aren't interested in gardening, so what I've learnt over the years won't get passed on.

So with feeding the soil, my vegie garden has been added to with a great topsoil with Mushroom Compost added, along with Dynamic Lifter and now today we'll add Cow Manure, Sheep Manure  and Straw Mulch, so my tomato crop lasts a long dry Summer and will be fed right through.

As for watering from above, we have used a technique on each plant, where a poly drain hose is buried below the plant so watering can be achieved from above without splashing water on the leaves of the tomato. I'll look up some photos and show how this works.


Improving our garden bed soil after adding new soil/mushroom compost. 

Before this cow manure and straw mulch went on, Jan dug a trench down the middle of the two garden beds, while I opened up the compost bin. We filled both trenches with compost, as both gardens were devoid of worms. The compost had 1000's of worms, so half are residing in each garden bed now. The trenches were covered with soil which will allow the worms to move through the soil.

Saturday, September 15, 2018

Dutch in Origin

My latest and last lot of tomato seeds for the season is now planted. I was told about these seeds ages ago, but thought they were Italian, but it turns out they're Dutch in origin, so I'm up for the challenge. Apparently a nice red tomato of some size, so we'll see what eventuates, if I can get them to germinate..


New Seedlings - Last Weeks Sowing

Here are a couple of photos of the latest seedlings planted last weekend, with my White Cherry and Poil Blanc first up and running. Some seeds in the last trays are double ups, as they have grown at least one plant in the original planting and one plant is all I need.


Friday, September 14, 2018

Today's Sowing

Well, sowing of Tomato seeds will end tomorrow after I get seeds for one more Italian variety my friend has, not sure if it has a name, but I'll try and grow it anyway.
Here is the last tray that I'll be doing this year, the varieties are some I've tried before along with some 'untried' varieties. As you can see in this photo, some varieties are what I've already tried and because of no shows, I've redone them.

In this lot are Chocolate Stripes, Cebrino, Grub's Mystery Green, Crisana, Purple Russian, Russo Sicilian, Collioure Long Plum, Fargo, Nicoleta & Morado. I'm not sure how I'll go with Morado, as I only had 6 seeds left and I had to ask a friend if he could send me some seed, which arrived today. The Nicoleta that have germinated have mostly had stuck seed coats, so I've tried again with these. Crisana, Cebrino and a couple of others have been good in the past, so retrying a few.


Today's sowing

And So It All Begins

Today, I started to pot up the tomato seedlings as they are breaking out their first true leaf, so time to get them into pots of their own now. I've shopped in advance and got the potting mix and polystyrene cups in readiness for today. The foam cups aren't ideal in our environment, but as they're here, I use them instead of my good plant tubes.


The foam cups have drainage hole melted into them with a soldering iron, as shown here.


I don't use plastic labels either, as they tend to fall out over time, so the variety name is written on the lip with a ballpoint pen.


I have some orders for this variety (MS) so at this stage 20 seedlings have been potted up. Something to remember when potting up your tomato seedlings, that is to plant them deeper than how the grew when starting out, with the cotyledon about 5mm above soil level. What happens here is, the stem below the cotyledons will eventually grow roots up its length, making your plant a bit stronger. 

Thursday, September 13, 2018

Hibiscus trionum

One of my favourite Australian Native Hibiscus flowers would be the Hibiscus trionum, a plant that is a perennial and will probably get killed off with the first frost here, but I'm growing some and giving my friend some to grow too. These plants produce an abundance of seed if allowed to stay on the plant after flowering and will readily self sow from dropped seed.

These plants look great planted in an open garden bed with other natives and will be sure to please. Saved seeds from these plants keeps quite well in a ziplok bag and the best part is they germinate fairly quickly.

I'm hoping to repay a favor with the rest with Mitch at the Nursery, after his donation of some Propagation Mix one day when the Hardware store was closed and I needed some.


 Seedlings pricked out today
Hibiscus trionum flower

Wednesday, September 12, 2018

Some Tips on Using a Heat'n'Grow Thermostat Controlled Heat Pad

I'm writing this with newbie propagators in mind, who want to use bottom heat to grow cuttings, or germinate seeds using a Heat Pad. In order to make the job as foolproof as possible, I'd suggest using a heat pad with inbuilt thermostat. If we were to use the Heat'n'Grow Range of pads as examples of what's available, we start off with  the following. The numbers listed are the wattage of each pad.

TPS 020 is a single tray unit.
TPS 040 is a double tray unit
TPS 080 is a four tray unit.
 
https://heatngrow.com.au/

No matter which of these you use, the principal is going to be the same and although it sounds easy to sit a tray of seed raising mix on the pad, you've really got to know a bit about growing with bottom heat in the first place. With all three models of the heat pads listed above, each will come with a piece of felt like material, cut to fit the top of the pad. This material is the most important part you'll use, because this is the conductor for transferring heat to the seed tray, simple as that. When you set up your heat pad ready to start your cuttings or seed, this felt like material needs to be wet thoroughly and excess water squeezed out. The growing medium used for seeds or cuttings should have been wet and allowed to drain prior to placing on the pad.

Once you get to this stage, you should also have some sort of thermometer to show what the temperature in the tray is doing. Depending on the wattage of the unit, the thermostat should be set to approx. 30C as the initial temperature and then and only then adjust it up or down by using your thermometer. The thermostat can't see what the medium temperature is doing, so be careful here and adjust it to attain an average temperature of 22C.

It's now at this stage where the variables come into using the heat pad efficiently as well as effectively. One variable that will trick you at some point in using the pad, is the amount of water in the felt as when it dries out, the temperature will not stay where the thermostat is set, so water needs to be added to the felt and the temperature will rise to where is was originally set.
Another variable, and there are a few to know, is the moisture in the tray, "what's the mix doing", as with anything where heat is involved the mix will dry out. A higher temperature may give you the indication that the mix is drying.

The most important thing here when watering the felt material, is that if you wet the felt too much, you risk the chance of starting a capillary action, where the excess water will be taken up from the mat and actually soak the growing medium in the tray, damping off will be your friend if you're not careful.

I write this knowing full well that when I grow tomato seeds, I sometimes water with the nozzle on the hose and actually flood the felt. Different people will tell you different things, but whatever you do using the heat pad, is to remember that it's controlled by one person, 'you'. I've been playing with both seed and cutting propagation for a long time and of the two Heat'n'Grow TPS 080 pads I use, one is set to give me 22C at the root level of the growing medium, the second needs to be adjusted when I set up, just like I've described above.

The main thing here is to remember that the water in the felt beneath the seed tray is the conductor for your heat, hone your skills on how wet this felt needs to be and you'll have far less problems using one.


 The TPS 080 - 4 Tray in use


A TPS 040 - 2 Tray in use.